Quepid is an innovative tool from our partners Open Source Connections, which allows you to bridge the gap between content owners (who really know what’s in your search index and how people might search for it) and search developers (who can tweak the search engine to improve relevance, given some examples of ‘good’ and ‘bad’ results for a query). We’re increasingly using it in client projects – but how do you get started with creating test cases in Quepid? Viewing the various Quepid videos at http://quepid.com/support/ is the best place to get a sense of how Quepid works – so this is probably a good first step.
Now, let’s assume you have Quepid running in your browser – there’s a 30 day free trial which lets you create a single test case, which is a great way to try it out. A Case is used to illustrate a particular problem with search relevancy – say, how searching for ‘iPhone’ shows iPhone cases higher up the list than actual iPhones. Each Case contains a number of Queries. Note in this example we’re using Solr, but Quepid also works with Elasticsearch.
1. Hooking Quepid up to your search engine.
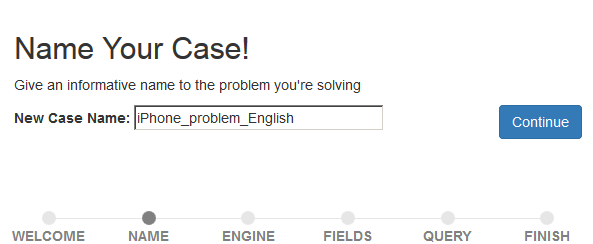
You’re going to need the help of your search developer for this one! He’ll need to tell you the URL of your Solr or Elasticsearch engine – and this will need to be accessible from the PC you’re running Quepid on. Since Quepid runs in the browser (although it stores its data in the Cloud) you shouldn’t have any trouble setting up secure access to your search engine – after all, your own PC is probably already within your corporate network. In Quepid, Click ‘Relevancy cases’ and ‘Create a case’. Give the case a name, like ‘iPhone_problem_English’ or ‘Two_word_queries’.
Enter the URL provided by your developer: for Solr, it will probably look a bit like:
http://your domain/solr/name of a Solr index/select
e.g.
http://www.mycompany.com/solr/myproducts/select

Quepid will then check it can see the Solr index – if it can’t, check that the URL is correct.
2. Setting up the right query fields
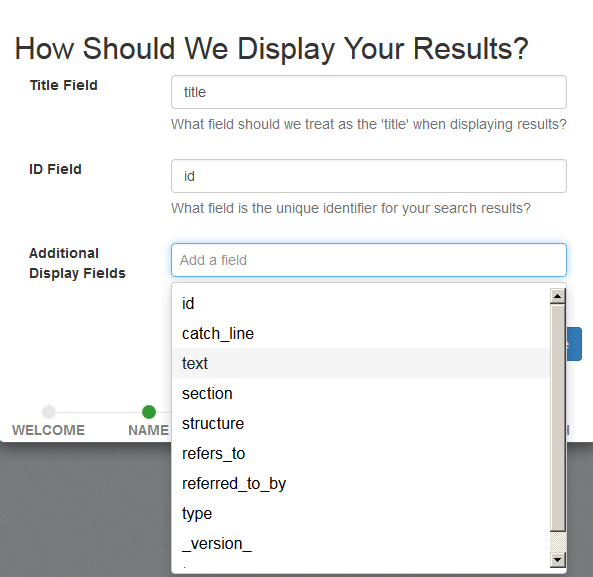
Now you need to tell Quepid an ID field (which must be unique) and a title field for each result. If you start typing, Quepid will show some suggestions – check with your developer for which ones to use as these will be defined in the schema configuration for your search engine. You can select any other fields to be displayed for each result: let Quepid suggest some by clicking in the Additional Display Fields box. All the above can be changed the Settings pane of the Tune Relevance panel later, so don’t worry if you don’t add everything now.
3. Adding some queries
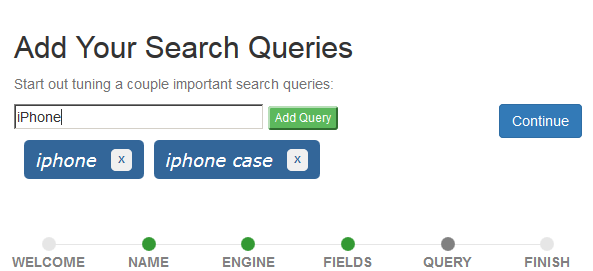
You can now add some queries to test – ‘iPhone’, ‘iPhone case’, ‘iphone’ or whatever fits the test you’re creating. Add a few for now, you can add more later. Once you’re done click Continue, then Finish and Quepid will try these queries out. Don’t worry if you don’t get many results for now.
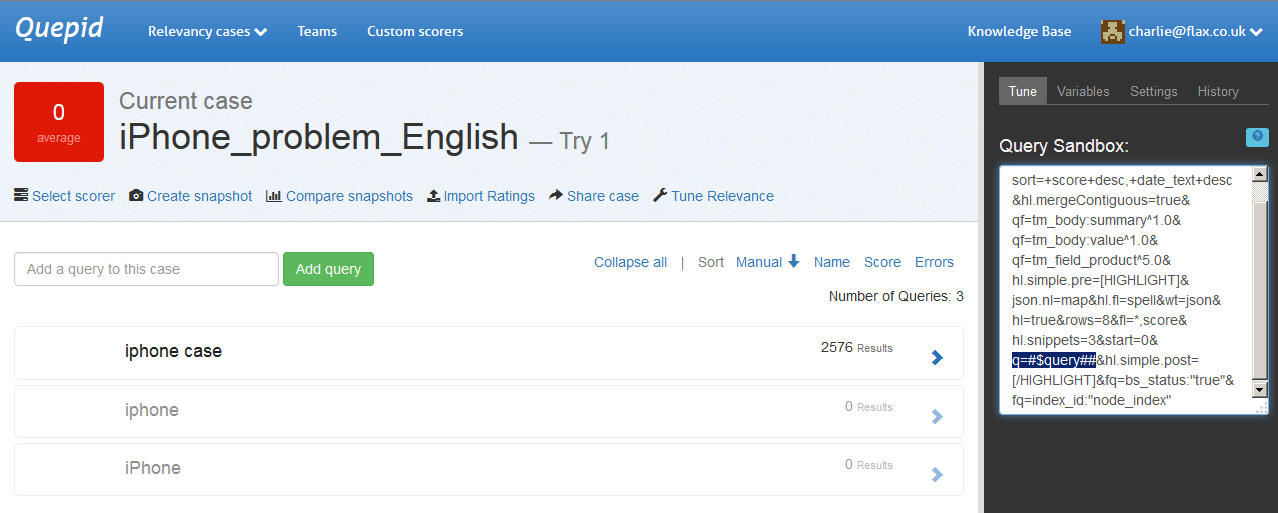
4. Using the right query parameters
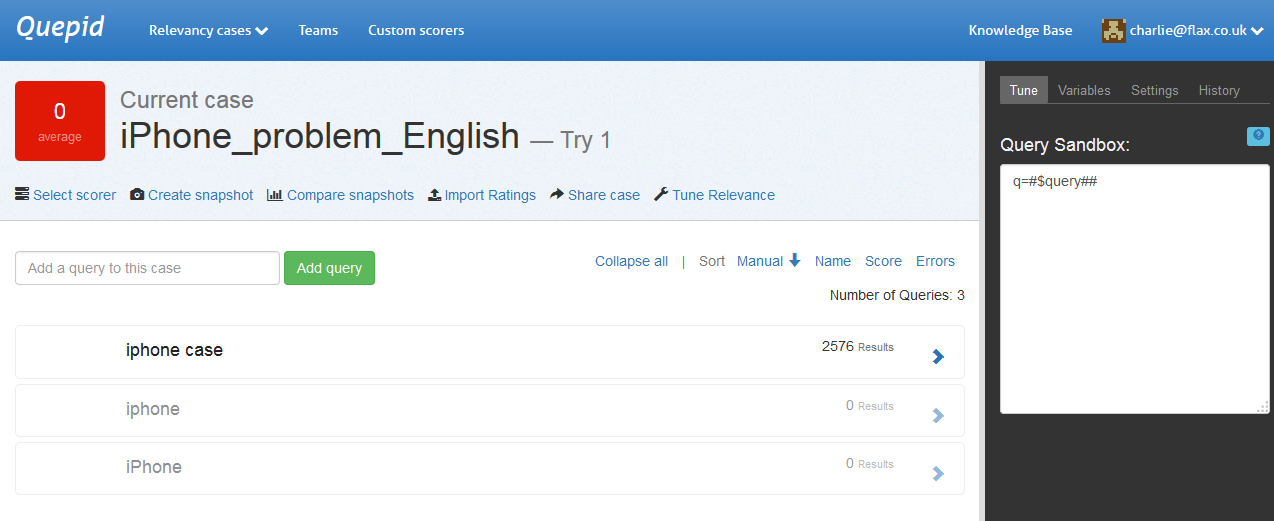
By default, Quepid only sends a very simple query to Solr or Elasticsearch (click on Tune Relevance and check the Tune panel, you should see just ‘#$query##’ – a token that represents the various test queries you added above), and your search application almost certainly sends something a lot more complicated! So you can be sure you’re testing the same configuration as your search application uses, you need to tell Quepid what query pattern is being used.
One way to start is to use Solr’s log files to see what actual queries are being run by your search application. Your search developer should be able to find a section that looks like this:
INFO - 2016-06-03 09:12:37.964; [ mydomain.com] org.apache.solr.core.SolrCore; [mydomain.com] webapp=/solr path=/select params={hl.fragsize=70&sort=+score+desc,+date_text+desc&hl.mergeContiguous=true&qf=tm_body:summary^1.0&qf=tm_body:value^1.0&qf=tm_field_product^5.0&hl.simple.pre=[HIGHLIGHT]&json.nl=map&hl.fl=spell&wt=json&hl=true&rows=8&fl=*,score&hl.snippets=3&start=0&q="iphone"&hl.simple.post=[/HIGHLIGHT]&fq=bs_status:"true"&fq=index_id:"node_index"} hits=5147 status=0 QTime=46
Stripping out the query gives us:
hl.fragsize=70&sort=+score+desc,+date_text+desc&hl.mergeContiguous=true&qf=tm_body:summary^1.0&qf=tm_body:value^1.0&qf=tm_field_product^5.0&hl.simple.pre=[HIGHLIGHT]&json.nl=map&hl.fl=spell&wt=json&hl=true&rows=8&fl=*,score&hl.snippets=3&start=0&q="iphone"&hl.simple.post=[/HIGHLIGHT]&fq=bs_status:"true"&fq=index_id:"node_index"
We need to replace the query (highlighted above, we’re searching for ‘iphone’) with a special token so Quepid can use this string to send all its test queries:
hl.fragsize=70&sort=+score+desc,+date_text+desc&hl.mergeContiguous=true&qf=tm_body:summary^1.0&qf=tm_body:value^1.0&qf=tm_field_product^5.0&hl.simple.pre=[HIGHLIGHT]&json.nl=map&hl.fl=spell&wt=json&hl=true&rows=8&fl=*,score&hl.snippets=3&start=0&q=#$query##&hl.simple.post=[/HIGHLIGHT]&fq=bs_status:"true"&fq=index_id:"node_index"
If you paste this string into Quepid’s Tune panel (click Tune Relevance to toggle this) then you know Quepid is sending the same type of queries as your search application. Click ‘Rerun my Searches’ and the results you see should be in a similar, if not identical, order to your search application.
5. Starting the tuning process
You should now have Quepid connected to your actual Solr index and running queries the same way that your search application does – you can now start the process of ranking the results. Once you have some scores, you can ask your search developer to try changing the query in the Tune panel to see if he can improve the relevance scores. Your journey towards better relevance has begun!
Do get in touch if you’d like more information about Quepid or how Flax can help you develop a process of test-based relevancy tuning.